Objective
Adding Products (single product upload)
Applies To
- Jumper
- Products (without variation)
This article will walk you through adding your products to the Jumper CMS for optimal setup and use
Procedure
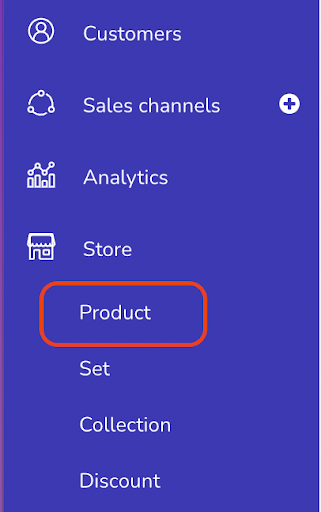
- To start adding products, go to Store > Product in the menu.
- Now click on Add/Import > Add product

In case your product list is empty, then you will find a screen similar as shown below, click on Add/Import > Add product to start adding products.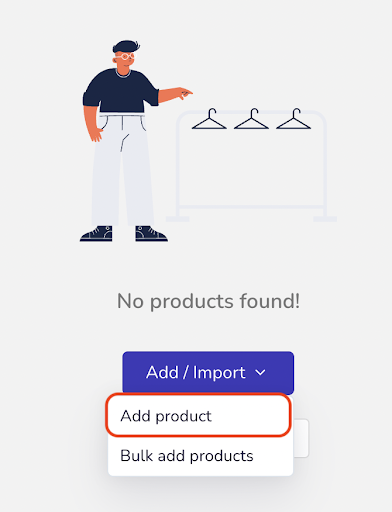
- Here you need to specify your product details such as Product name, Product’s checkout trigger, Short description and Product description.
Choose an appropriate checkout trigger, for e.g. #jaidenshoes001 (this hashtag needs to be unique only for your store)
Adding Description - with all relevant details, more pictures, videos, etc. we recommend keeping this short, simple and to the point to avoid distractions.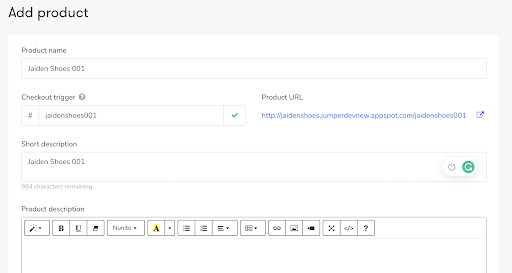
- Upload your Product Image, you can upload up to 5 images for a single product.
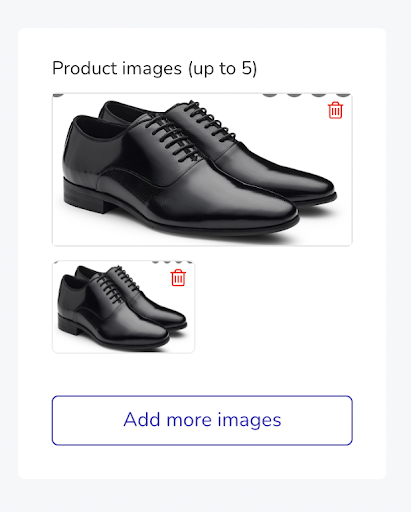
Note : having a square image or a horizontal in 1.91:1 format works best.
Recommended size is 1mb for single image upload. Maximum size limit is 4MB. - Now you can add ‘Product tags’, simply add the text that you wish to add as a tag in the input box and click on enter.
Product tags will make your products easily searchable. When a user mentions a Product Tag, all relevant Products with that Tag will be shown. This is currently a Beta Feature. (this step can be skipped if you do not wish to add products tags)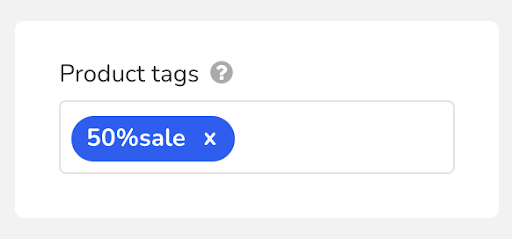
- Now you can toggle options for store visibility, checking address and email for the customers. Simply toggle the options if you do not wish to ask for these options for the product.
Note: These options are enabled only for single product checkout journey, while for collection journey the settings for collections overwrite the added product’s settings.
For e.g. if a product is toggled off for Visible in store, but is added to a collection then it would still appear in the collection for customers.
Visible on store?: There may be some products you want to keep private and only share links or even maybe sell offline via QR codes, toggle this off to hide it from the public facing website. (for e.g. when you toggle it off, this product would be hidden in your store.)
Do you want to ask customers their address?: Running an offline event or even a popup store? You don't really need their address as there's no need to deliver and is a pick up by the customer.. toggle this off and the conversational checkout will not ask the customer to fill in their address.
Do you require email of the customer?: Similar to address, toggle this on and off depending on what kind of a sale you're running and how important the e-mail is for you.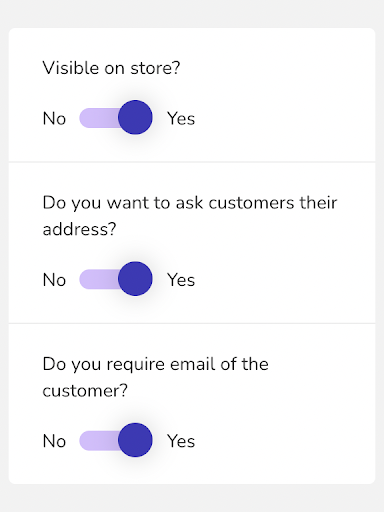
- Now choose if your product has variations, if not then add the base price, selling price, product weight, Stock and SKU for your product.
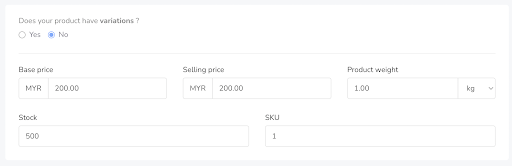
If your Product has variations, learn how to add variations here. - Next you need to specify if you want to ask shoppers for customizations or for them to provide special instructions and if you want to allow customers to buy more than one quantity.
Select the “no” option, if you do not wish to ask for customizations to customers or if you don’t wish to ask for quantity(basically skipping this step) and don’t want to allow more than one quantity per customer. Once you have filled these steps click on “Save Product”.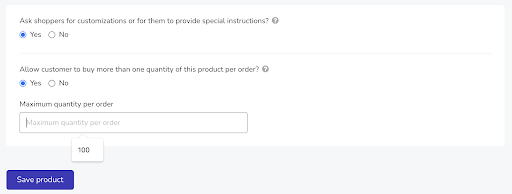
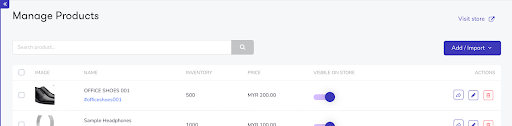
- Once you have saved your product you will see your saved products listed here. Now you can edit, delete or share your product link. (You can also choose from here if you want to keep the product visible or not in your store, simply by toggle)
Articles in this section
- Creating Collections with Categories
- Creating Collections without Categories
- Bulk Update of Products
- Adding Products in Jumper (Bulk Add products via CSV) - Without Variation
- Adding Products in Jumper (Single Product Upload) - With Variation
- Adding Products in Jumper (Single Product Upload) - Without Variation