Objective
Manage who can access the Jumper Dashboard and their permission status.
Applies To
- Jumper
- Team Members
- Groups
Procedure
Use the Team Members section under settings to add new roles who can access the dashboard based on the permissions provided.

Adding Admins
The admin role is special because it has access to everything on the Jumper Dashboard. Admins are the key account holders within the Jumper Platform. They can control who gets access to what parts of the platform and can change permissions for other team members and groups.
Restriction: An admin can not change/alter the role of another admin.
- Click on the Create button and then choose Team Member
- Input the email, First Name, and Last Name.
- Choose the Admin role from the Select Role drop-down list.
- Now click on Submit button to add the admin.


Adding Groups
A group defines the permissions for all members within the group. To allow restricted access to the Jumper platform, you need to first create a group with restricted permissions and then add members to that group.
- Click on the Create button and then choose “Group”
- A new page opens up for you to first define what the Group permissions should look like.
- Give the group a name so that you can identify the group. The naming convention is flexible as per your requirements.
- If the Group is a subset of another group of permissions and has access to Live Chat, choose which other group it reports to. Otherwise, feel free to choose “Admin” from the Report to drop-down list.
- If this group has access to Live Chat and will be used to answer customer queries, the Conversation routing method will be useful.
There are 2 Routing options available currently:-
Automatic Routing: Automatic Routing within a group works in a Round Robin fashion.
Example Scenario with 3 members in this group and when chat is assigned to this group: Chat 1 gets assigned to Agent A, Chat 2 to Agent B, Chat 3 to Agent C. However Chat 4 gets assigned to Agent A again and Chat 5 to Agent B, so on and so forth. The chats do not appear in the Requests Tab but go directly to the Active Chats tab of the user. - Manual Routing: Manual routing does not automatically assign chats to a particular agent in the group. However, it shows the incoming requests in the Request tab and any agent within the group can pick the chat by responding to it.
-
Automatic Routing: Automatic Routing within a group works in a Round Robin fashion.
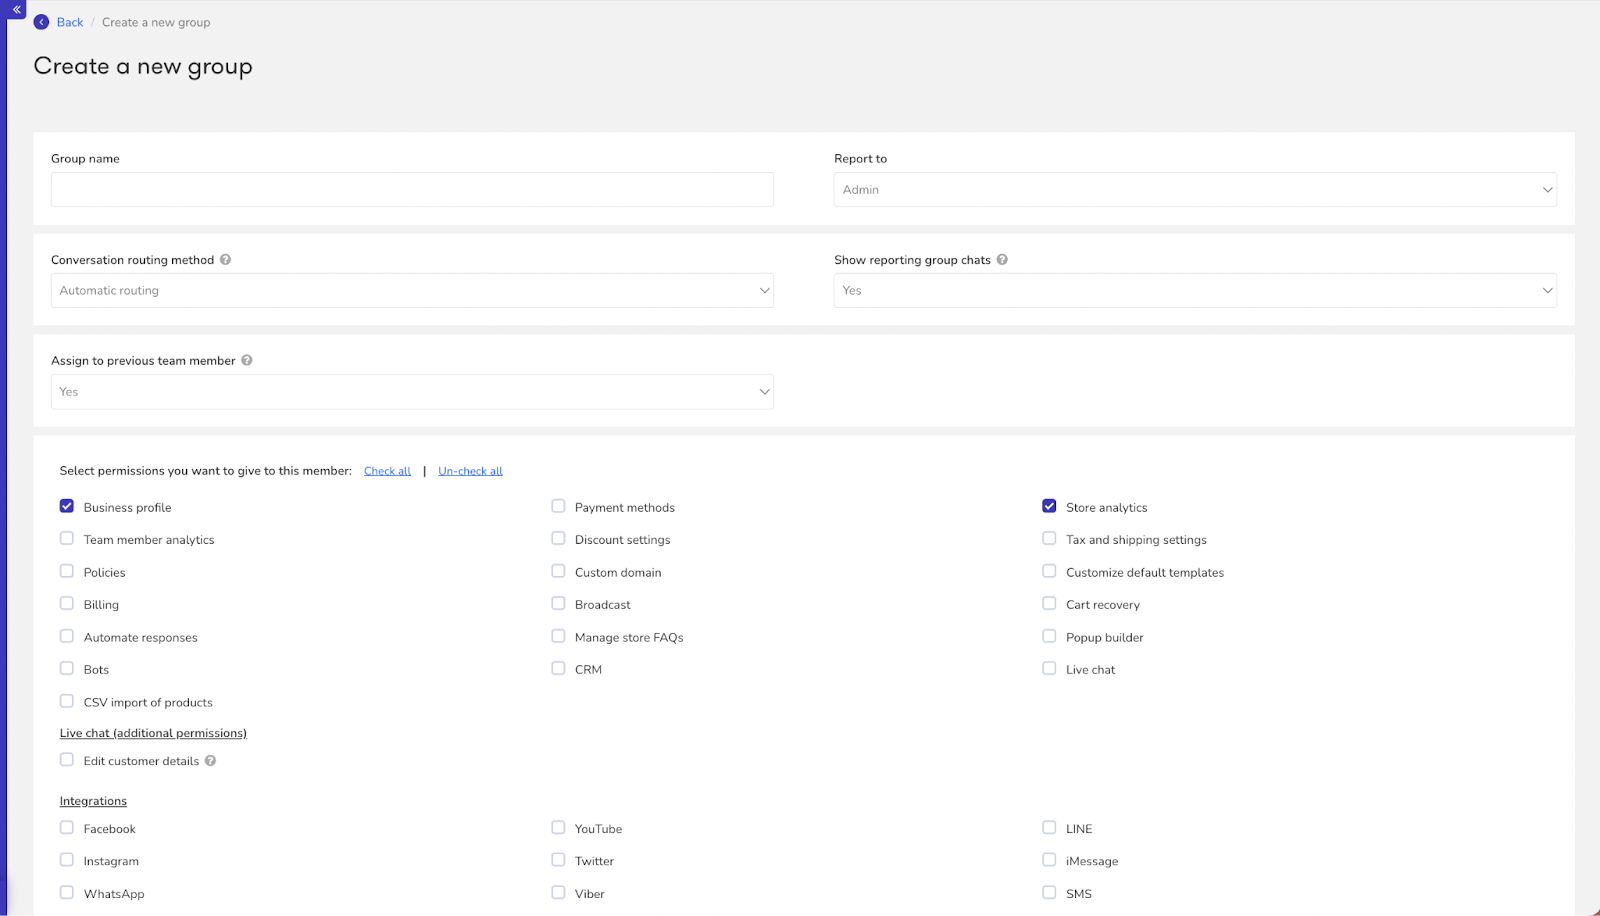
- Show reporting group chats: Choose Yes or No depending on the structure of your groups.
Eg. Group A reports to Group B.
Do you want chats of Group A to be visible to members of Group B? If so, choose Yes in the settings of Group B, else choose No. - Assign to previous team member: This feature allows you to route your customers to the same agent who was previously assigned.
This feature overrides the conversation routing method of manual routing and automatic routing (if selected “Yes”) and assigns conversation to the same agent that was previously assigned.
Case 1: New Customer Request for Support
Conversation routing method: Automatic routing
Assigned Agent: None
Group: Group A
Assign to previous team member: Yes
In this case when a customer requests support, then based on the round-robin technique the agent will be assigned.
Case 2: Existing Customer Request for Support
Conversation routing method: Automatic routing
Assigned Agent: Agent A
Group: Group A
Assign to previous team member: Yes
If a conversation was assigned to 'Agent A' previously and is now not assigned to anyone and the same customer comes back looking for live support, then it will assign this conversation to the same agent, i.e. 'Agent A'
Case 3: Existing Customer Request for Support from a New Group
Conversation routing method: Automatic routing
Assigned Agent: Agent A
Group: Group A (Customer Support)
Assign to previous team member: Yes
Assigned Agent: Agent B
Group: Group B (Operations Support)
Assign to previous team member: Yes
Let us say in the past the customer was assigned to Group A (i.e. Customer Support): Agent A. Now the customer is requesting support from Group B (i.e. Operations Support).
In this case when an existing customer request for support from a new Group (i.e. Group B: Operations Support), then based on the round-robin technique the new agent will be assigned under a new Group (i.e. Group B: Operations Support)
In future, if the customer requests back support from Group A (i.e. Customer Support), then it will assign the conversation to the same agent, i.e. 'Agent A' from Group A.

- Once the relevant permissions have been selected, click the Submit button.
- An admin can edit the permissions of the Groups at any point.
Adding Team Members
A team member is part of the Group that you have already created. If you wish to create a team member that does not fall into any group, first create the group and then add the team member to that group.
- Click on the Create button and then choose “Team Member”
- Input the email, First Name, and Last Name.
- Choose the Group you wish to assign this user to, from the Select Role drop-down list.
- Now click on Submit button to add the team member.